Everstart 1200 Peak Amp Jump Starter Manual PDF: A Comprehensive Guide
This comprehensive guide details the Everstart 1200 Peak Amp Jump Starter, offering instructions for safe operation, troubleshooting, and maximizing its potential for vehicle assistance․
The Everstart 1200 Peak Amp Jump Starter is a portable power solution designed to quickly and safely jump-start vehicles with discharged batteries․ This robust device, often found as the Schumacher SL1668 or similar models, provides up to 1200 peak amps, making it suitable for both gasoline engines (up to 60L) and diesel engines (up to 30L)․
This jump starter isn’t just for emergencies; it’s a valuable tool for anyone who owns a vehicle, offering peace of mind and independence from relying on roadside assistance․ The Everstart Maxx versions, like the J5CPDE, enhance portability and convenience․ Understanding its features and proper usage, as detailed in the user manual, is crucial for optimal performance and safety․ This guide will walk you through everything from initial setup to troubleshooting common issues, ensuring you’re prepared for any situation․
Whether you’re facing a cold weather start or a simply drained battery, the Everstart 1200 is engineered to deliver reliable power when you need it most․
Understanding the Key Features
The Everstart 1200 Amp Jump Starter boasts several key features designed for user convenience and effectiveness․ Its 1200 peak amps output provides substantial starting power for a wide range of vehicles, encompassing both gasoline and diesel engines․ Many models, including lithium-ion variants like the Schumacher FR01544, prioritize lightweight design and enhanced portability․
A crucial feature is the built-in safety mechanisms, such as reverse polarity protection, preventing damage to both the jump starter and the vehicle’s electrical system․ The integrated LED flashlight offers illumination during nighttime emergencies․ The Everstart Maxx models often include a USB port for charging mobile devices, adding to their versatility․
Understanding the low battery indicator is vital for maintaining optimal performance․ Regularly checking the manual for specific details regarding your model – whether it’s the standard Everstart 1200 or a Maxx variant – will ensure you leverage all its capabilities effectively and safely․
Safety Precautions Before Use
Prior to utilizing the Everstart 1200 Peak Amp Jump Starter, meticulous adherence to safety precautions is paramount․ Always wear appropriate eye protection – safety glasses or goggles – to shield against potential sparks or acid splashes․ Ensure the jump starter is fully charged before attempting to jump-start a vehicle․ Never attempt to jump a frozen battery, as it may explode․
Avoid contact between the clamps; accidental contact can cause short circuits and potential injury․ Confirm the vehicle’s voltage (typically 12V) matches the jump starter’s output․ Do not smoke or create any open flames near the battery during the jump-starting process․ Refer to your vehicle’s owner’s manual for specific jump-starting instructions․
Proper ventilation is crucial; work in a well-ventilated area to prevent the buildup of potentially explosive hydrogen gas․ If the battery shows signs of damage – cracks, leaks – do not attempt to jump-start it․ Always disconnect the clamps in the reverse order of connection․
Package Contents & Component Identification
Upon opening your Everstart 1200 Peak Amp Jump Starter package, verify all components are present․ The standard package includes the jump starter unit itself, a set of heavy-duty jumper cables (red positive and black negative), and this user manual․ Some models may also include a carrying case for convenient storage and transport․
The jump starter unit features a power switch, an LED charge indicator, and output terminals for the jumper cables․ The jumper cables are color-coded for easy identification – red for positive (+) and black for negative (-)․ Familiarize yourself with the location of the charging port, typically used with a standard DC adapter․
Inspect the cables for any signs of damage before each use․ The manual often includes a diagram illustrating each component and its function․ Understanding these components is crucial for safe and effective operation of your jump starter․ Retain the packaging for potential warranty claims or returns․
Charging the Jump Starter
To ensure optimal performance, fully charge your Everstart 1200 Peak Amp Jump Starter before its first use and after each jump start․ Connect the provided DC adapter to the charging port on the unit and plug it into a standard 120V AC outlet․ The LED charge indicator will illuminate, typically displaying red during charging and green when fully charged․
Charging time varies, but generally takes between 4-8 hours for a complete charge․ Avoid overcharging, as this can potentially reduce the battery’s lifespan․ Disconnect the charger once the indicator shows a full charge․ The manual details specific charging recommendations and warnings․
Regularly check the charge level, especially during periods of infrequent use․ A partially discharged jump starter may not have sufficient power to start a vehicle․ Maintaining a full charge guarantees readiness for emergency situations․ Refer to the manual for troubleshooting charging issues․
Step-by-Step Jump Starting Procedure
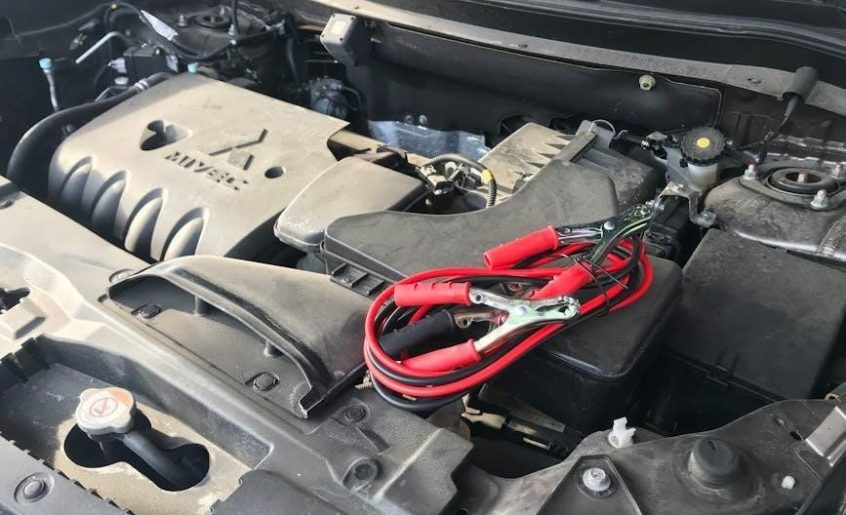
Before initiating, ensure both vehicles are turned off․ Connect the red clamp to the positive (+) terminal of the dead battery, then the black clamp to a solid, unpainted metal surface on the disabled vehicle’s engine block – away from the battery․ Turn the jump starter ON․ Following the manual, select the appropriate voltage setting․

Attempt to start the disabled vehicle․ If it doesn’t start immediately, wait a few minutes and try again․ Avoid prolonged cranking (no more than 10 seconds at a time) to prevent overheating․ Once the vehicle starts, carefully disconnect the clamps in reverse order: black first, then red․
Allow the revived vehicle to run for several minutes to recharge its battery․ The Everstart 1200’s manual provides detailed diagrams and safety precautions․ Always prioritize safety and consult the manual if unsure about any step in the process․
Connecting the Clamps: Red (+) to Positive

The first crucial step involves connecting the red clamp, designated for the positive (+) terminal, to the dead battery․ Locate the positive terminal – it’s typically marked with a plus sign (+) or a red cover․ Ensure a firm and secure connection; a loose connection can hinder the jump-starting process and potentially cause sparks․
Refer to your Everstart 1200 Peak Amp Jump Starter Manual PDF for visual guidance․ Double-check that the clamp is firmly attached to the metal terminal, not just the plastic casing․ This connection establishes the electrical pathway for transferring power from the jump starter to the vehicle’s battery․
Prioritize safety: avoid touching any metal parts of the clamps while connecting․ Once the red clamp is securely in place, proceed to connect the black clamp, following the instructions detailed in the manual, ensuring a safe and effective jump start․

Connecting the Clamps: Black (-) to Negative
After securely attaching the red clamp to the positive terminal, the next step is connecting the black clamp to a solid, unpainted metal surface on the vehicle’s chassis, away from the battery․ This serves as the negative (-) connection, completing the circuit․ Do not connect the black clamp directly to the negative terminal of the dead battery, as this can create sparks and potentially ignite flammable gases․
Consult your Everstart 1200 Peak Amp Jump Starter Manual PDF for recommended grounding points․ A suitable location might be a metal engine bracket or a bolt on the vehicle’s frame․ Ensure the connection is firm and makes good metal-to-metal contact․

Again, prioritize safety․ Avoid contact with any moving parts or hot surfaces while making the connection․ Proper grounding is crucial for a safe and successful jump start, as outlined in the manual, preventing damage to the vehicle’s electrical system․
Initiating the Jump Start Process

With both clamps securely connected – red to positive, black to a grounded metal surface – you can now initiate the jump start․ Refer to your Everstart 1200 Peak Amp Jump Starter Manual PDF for specific instructions related to your model․ Typically, this involves turning the jump starter’s power switch to the “ON” position․ The unit will likely indicate readiness with a light or audible tone․
Attempt to start the disabled vehicle․ If it doesn’t start immediately, allow the jump starter to run for a short period (as detailed in the manual) before trying again․ Avoid prolonged cranking attempts, as this can overheat the starter motor․
Once the vehicle starts, carefully disconnect the clamps in the reverse order: black first, then red․ Consult the manual for any post-jump start recommendations, such as allowing the vehicle to run for a period to recharge the battery․
Troubleshooting Common Issues
If your Everstart 1200 Peak Amp Jump Starter fails to operate, consult the Everstart 1200 Peak Amp Jump Starter Manual PDF for troubleshooting guidance․ A common issue is a fully discharged unit; ensure it’s adequately charged before attempting a jump start․ Verify the clamp connections are secure and correctly positioned – red to positive, black to ground․
If the vehicle doesn’t start, double-check the polarity of the connections․ Incorrect polarity can trigger safety features and prevent operation․ A low battery indicator on the jump starter suggests insufficient charge․ The manual details solutions, typically involving a longer charging period․

Should the unit display an error code, refer to the manual’s error code section for specific explanations and recommended actions․ If problems persist, avoid disassembling the unit and contact customer support․
Low Battery Indicator & Solutions
The Everstart 1200 Peak Amp Jump Starter features a low battery indicator, signaling insufficient charge for a successful jump start․ Consult the Everstart 1200 Peak Amp Jump Starter Manual PDF for detailed guidance․ A flashing or solid low battery light indicates the need for immediate recharging․
To address this, connect the jump starter to a standard 120V AC outlet using the provided charging cable․ Allow ample charging time – typically several hours – for a full recharge․ The manual specifies the charging duration․ Avoid interrupting the charging cycle prematurely․
If the unit consistently displays a low battery even after a full charge, the internal battery may be nearing the end of its lifespan․ Refer to the warranty information within the manual for potential replacement options or contact customer support for assistance․
Reverse Polarity Protection Explained
The Everstart 1200 Peak Amp Jump Starter incorporates reverse polarity protection, a crucial safety feature detailed in the Everstart 1200 Peak Amp Jump Starter Manual PDF․ This system prevents damage to both the jump starter and your vehicle’s electrical system if the clamps are accidentally connected incorrectly – positive to negative, or vice versa․

Upon detecting reversed polarity, the unit will typically emit an audible warning and may prevent the jump start process from initiating․ Do not attempt to force a jump start under these conditions․ Immediately disconnect the clamps and re-establish the correct connection: red clamp to positive (+) terminal, and black clamp to negative (-) terminal․
While this protection is robust, it’s not foolproof․ Repeated instances of reversed polarity connection can potentially compromise the system․ Always double-check the polarity before initiating the jump start, referencing the manual for clear visual guidance․
Maintenance and Storage Guidelines
Proper maintenance and storage, as outlined in the Everstart 1200 Peak Amp Jump Starter Manual PDF, are vital for ensuring the longevity and optimal performance of your jump starter․ Regularly inspect the clamps for corrosion and clean them with a wire brush if necessary․ Ensure the casing is free from debris and damage․
To maintain battery health, fully charge the jump starter every three to six months, even when not in use․ Store the unit in a cool, dry place, away from direct sunlight and extreme temperatures․ Avoid storing it with the clamps touching any metallic surface, as this can cause self-discharge․
The manual recommends disconnecting the jump starter from any power source during extended storage periods․ Following these simple guidelines will help preserve the unit’s functionality and ensure it’s ready when you need it most, extending its lifespan considerably․
Technical Specifications: Ampere, Voltage, etc․
The Everstart 1200 Peak Amp Jump Starter Manual PDF details crucial technical specifications for optimal use and understanding․ This unit boasts a 1200 Peak Amp starting current, capable of jump-starting most gas and some diesel engines․ The continuous output amperage is typically around 100 Amps․
Input voltage requirements are 12V DC, compatible with standard vehicle charging ports or a wall adapter (often sold separately)․ The jump starter’s internal battery is typically a sealed lead-acid type, with a capacity around 19Ah․ Its dimensions are approximately 11․5 x 7․5 x 8․5 inches, and it weighs around 17․6 pounds․
The manual also specifies a charging time of approximately 4-6 hours for a full charge․ Understanding these specifications, as detailed in the PDF, ensures safe and effective operation, maximizing the jump starter’s capabilities․
Compatibility: Vehicle Types (Gas & Diesel)
The Everstart 1200 Peak Amp Jump Starter Manual PDF provides essential guidance on vehicle compatibility․ Generally, this jump starter is designed for vehicles with up to 8-cylinder gas engines and some diesel engines․ It can typically jump-start gasoline engines up to 6․0 liters and diesel engines up to 3․0 liters․
However, the manual emphasizes checking your vehicle’s owner’s manual for specific recommendations․ Modern vehicles with complex electrical systems or start-stop technology may have unique requirements․ The Everstart unit is generally compatible with cars, trucks, SUVs, and vans․
It’s crucial to avoid using the jump starter on vehicles with significantly larger engine displacements or different voltage systems․ Referencing the PDF’s compatibility chart and understanding your vehicle’s specifications ensures a safe and successful jump-start, preventing potential damage․
Everstart Maxx 1200 vs․ Other Models
The Everstart 1200 Peak Amp Jump Starter Manual PDF often includes comparisons to other Everstart models․ The Maxx 1200 generally offers a higher peak amperage than the standard 750 amp version, providing more starting power for larger vehicles or colder temperatures․ This increased capacity makes it suitable for a wider range of cars and light-duty trucks․
Compared to other brands, the Everstart Maxx 1200 is often positioned as a budget-friendly option․ While it may not have all the features of premium jump starters – like built-in power banks or advanced diagnostics – it delivers reliable performance for its price point․ The manual highlights its robust construction and ease of use․
Users should consult the PDF to understand the specific differences in features, amperage output, and included accessories when comparing the Maxx 1200 to alternative jump starter options available on the market․
Finding the Everstart 1200 Manual PDF Online
Locating the Everstart 1200 Peak Amp Jump Starter Manual PDF is straightforward․ A primary source is the Walmart website, as Everstart is a Walmart brand․ Searching “Everstart 1200 Jump Starter Manual PDF” on Walmart’s site typically yields a direct download link․ Alternatively, numerous third-party websites archive user manuals, offering the PDF for free access․
Be cautious when downloading from unofficial sources; ensure the site is reputable to avoid malware․ A quick scan with antivirus software is always recommended․ The manual itself provides crucial safety information, operating instructions, and troubleshooting tips․
Many online forums and communities dedicated to automotive tools also host links to the Everstart 1200 manual․ Utilizing search engines with specific keywords like “Everstart Maxx 1200 manual” will quickly surface relevant results, ensuring you have the necessary documentation at your fingertips;
Warranty Information & Customer Support
Everstart jump starters, including the 1200 Peak Amp model, generally come with a limited warranty, typically covering defects in materials and workmanship․ The standard warranty period is often one year from the date of purchase, but verifying the specifics on your receipt or the official Everstart manual PDF is crucial․
For warranty claims or customer support, contacting Walmart directly is the primary route․ Their customer service department can assist with troubleshooting, warranty processing, and locating replacement parts․ Online support is also available through the Walmart website, offering FAQs and contact forms․

Retaining your purchase receipt is essential for warranty validation․ The Everstart 1200 manual PDF may also contain specific warranty details and claim procedures․ Should you encounter issues not covered by the warranty, Walmart’s customer support can still provide guidance and potential repair options․